Learn how to connect Blink Doorbell to Echo Dot – here, we will walk you through the seamless process of connecting your Blink Doorbell to an Echo Dot, enhancing your home security and convenience.Early Finder
Smart home device integration has revolutionized how we interact with our living spaces. One popular combination is connecting a Blink Doorbell to an Amazon Echo Dot, allowing you to monitor your doorstep conveniently. This synergy lets you view live video feeds, receive motion alerts, and even communicate with visitors, all through voice commands.
Read Also: 5 Steps to Get Clash Mini Faster
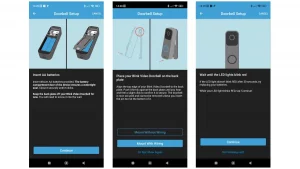
Step 1: Set Up Your Blink Doorbell
Before connecting devices, ensure your Blink Doorbell is appropriately installed and configured. Follow the manufacturer’s instructions to mount and set up the doorbell, ensuring it’s properly connected to your Wi-Fi network. Download and install the Blink Home Monitor app on your smartphone, and log in or create an account if needed.
Read Also: 5 Steps to get a refund on Amazon
Step 2: Prepare Your Echo Dot
Ensure your Amazon Echo Dot is plugged in and set up on the same Wi-Fi network as your Blink Doorbell. The Echo Dot will be the hub for accessing and controlling your doorbell.Connect Blink Doorbell to Amazon Echo Dot
Step 3: Enable the Blink Skill
Open the Amazon Alexa app on your smartphone and go to the “Skills & Games” section. Search for the “Blink SmartHome” skill and enable it. Link your Blink account by signing in with your Blink credentials. This step establishes a connection between your Blink Doorbell and the Amazon Echo Dot.
Step 4: Discover Devices
Use the Alexa app to discover new devices after enabling the skill and linking your accounts. This process allows your Echo Dot to recognize the Blink Doorbell as a controllable device.
Read Also: 9 Steps to Find Someone’s Amazon Wishlist
Step 5: Name Your Devices
Assign clear and distinct names to your devices to avoid confusion when issuing voice commands. For instance, you might name your Blink Doorbell “Front Door” or something similar. This step is essential for seamless communication with Alexa.
Step 6: Test the Connection
Ask Alexa to show you the live feed from your Blink Doorbell using the device’s name in your command. For example, say, “Alexa, show me the Front Door” to view the live video feed on a compatible Echo device with a screen. Verify that the connection is working smoothly.
Step 7: Set Up Routines (Optional)
Amazon Alexa allows you to create routine actions triggered by a single voice command. You can customize routines to integrate your Blink Doorbell into your daily routines. For instance, you could create a pattern that turns on your porch lights and displays the doorbell feed when you say, “Alexa, I’m home.”
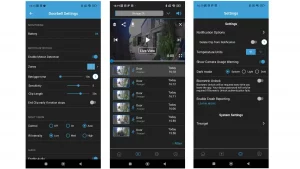
Step 8: Adjust Settings
Explore the settings within the Alexa app to customize your Blink Doorbell’s behaviour with your Echo Dot. You can modify motion detection settings, adjust video quality, and manage notifications according to your preferences.
Read Also: How to find Amazon Add-on Items
Step 9: Stay Updated and Enjoy
With your Blink Doorbell successfully connected to your Amazon Echo Dot, you can now easily monitor your doorstep. Receive motion alerts, view live feeds, and communicate with visitors all through simple voice commands.
Conclusion
Integrating your Blink Doorbell with an Amazon Echo Dot offers a seamless and interactive way to enhance your home security and convenience. By following these step-by-step instructions, you can ensure a smooth connection process and begin enjoying the benefits of voice-controlled access to your doorbell’s features. With technology working harmoniously to simplify daily tasks, you can experience peace of mind and a smarter way of living.
Share This Post:


