How to cancel a Microsoft subscription: Microsoft offers a range of subscription services, including Microsoft 365, Xbox Game Pass, and Xbox Live Gold, which provide users access to various products and features. However, there may come a time when you decide to cancel your Microsoft subscription. Whether due to cost concerns, a change in needs, or simply wanting to explore alternative options, this article will guide you through canceling your Microsoft subscription.
Steps on How to Cancel Microsoft Subscription
Step 1: Determine the Type of Subscription
The first step is to identify the specific Microsoft subscription you wish to cancel. Microsoft offers several subscription services, and the cancellation process can vary slightly depending on the type of subscription. Ordinary subscriptions include Microsoft 365, Xbox Game Pass, and Xbox Live Gold.Early Finder

Read Also: How to Get Online Business Degree Programs
Step 2: Review Subscription Details
Before canceling cancel our subscription, it’s essential to review the terms and conditions of your subscription. Note any cancellation policies, such as potential fees or refund eligibility. Familiarize yourself with the cancellation process to ensure a smooth experience.
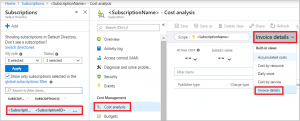
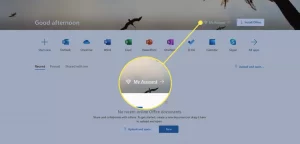
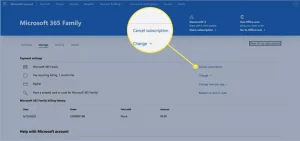
Step 3: Access Your Account
You must access your Microsoft account to cancel your Microsoft subscription. Visit the official Microsoft website and sign in with the credentials associated with your subscription. Once logged in, navigate to your account settings or subscription management section.
Read Also: 8 Steps to Delete Photo Albums on iPhone
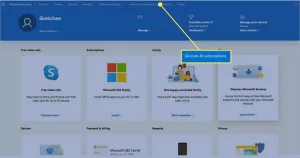
Step 4: Locate Subscription Settings
Within your account settings or subscription management section, locate the option to manage your subscriptions. This section should provide an overview of your active subscriptions, including the one you wish to cancel.
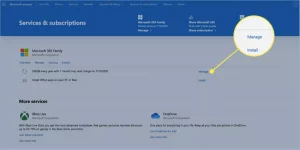
Step 5: Initiate Cancellation
Select the specific subscription you want to cancel, and you should find an option to cancel or manage the subscription. Click on the appropriate button or link to begin the cancellation process. Microsoft may offer additional incentives to encourage you to keep your subscription. If you’re determined to cancel, stay focused and proceed with the cancellation.How to cancel microsoft subscription
Read Also: 8 Steps to Delete Photo Albums on iPhone
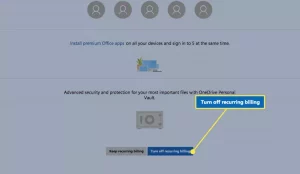
Step 6: Follow Cancellation Prompts
Microsoft may ask you to provide a reason for canceling your subscription or offer alternative plans. Reading through the prompts carefully and selecting the appropriate options is essential. Be aware that some subscriptions may require completing a cancellation survey before proceeding.
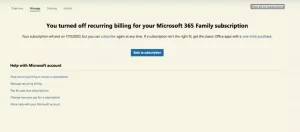
Step 7: Confirm Cancellation
Once you have completed the necessary steps and provided any information, Microsoft will ask you to confirm your cancellation. Double-check all the details and ensure that you are canceling the correct subscription. Confirm your cancellation request, and if applicable, note down any confirmation or reference numbers provided for future reference.
Read Also: 5 Steps to Charge Apple Pencil 2
Step 8: Verify Cancellation
After confirming your cancellation, Microsoft may send you a confirmation email. This email serves as verification that your subscription has been canceled. Keep a copy of this email or take a screenshot for your records.
Step 9: Review Billing Statements
Following the cancellation, you must review your billing statements to ensure you are no longer being charged for the subscription. If you notice any continued charges, contact Microsoft support for assistance in resolving the issue.
Read Also: 4 Methods to see blocked messages on iPhone
Conclusion
Canceling your Microsoft subscription is a straightforward process once you know the steps. You can successfully terminate your subscription by identifying the type of subscription, accessing your account settings, and navigating the cancellation process. Always review the cancellation policies and terms associated with your subscription to avoid unexpected charges. Remember to keep track of your confirmation emails and monitor your billing statements for any follow-up actions.
Share This Post:


